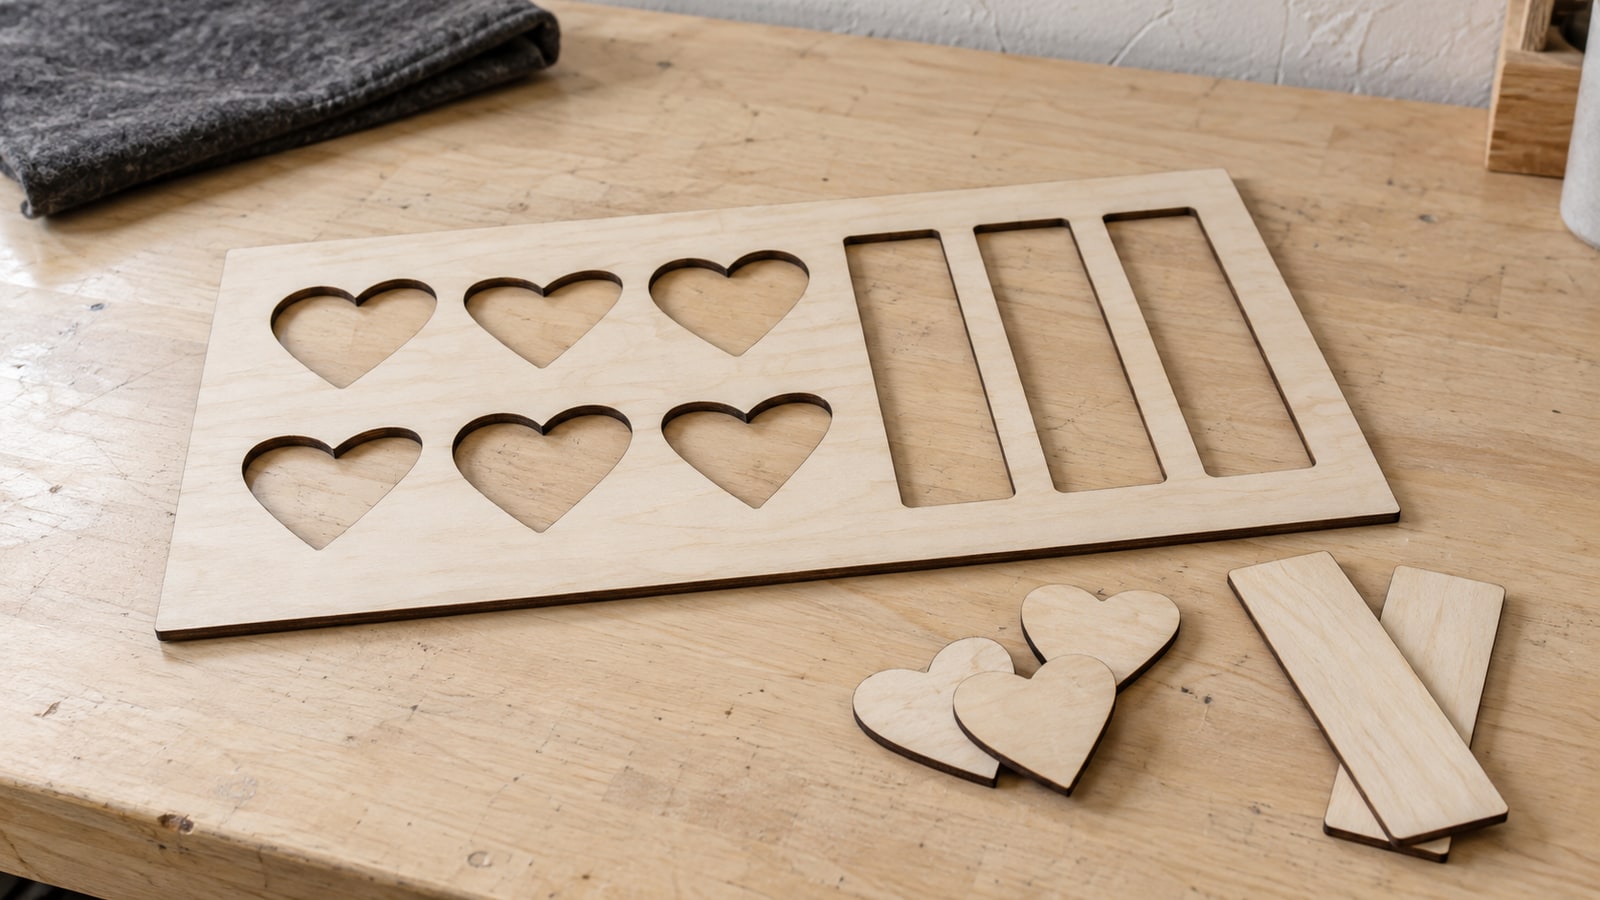
You cut six hearts out of a fresh sheet of plywood, and what is left looks like a snowflake with a hole in the middle of every useful area. The sheet cost real money. The parts used maybe a third of it, and the rest is now a set of awkward fragments too small for the next job and too big to throw away without wincing.
Material is the cost that comes back every single time. The machine is bought once, the design file is bought once, and then the plywood, the acrylic, and the vinyl keep leaving the building inside every order you ship. How tightly the parts sit on the sheet is the one lever you control entirely from the file, before anything switches on.
Tip
Short answer: nesting is arranging parts on the sheet so they occupy as little of it as possible. Rotate parts to match their neighbours, tuck concave shapes into each other, and drop small parts inside the hollows of big ones. Leave enough gap for your machine's kerf and whatever the material does around the cut, and find that gap by testing on scrap rather than by copying a number off the internet.
The bounding box is lying to you
Every design in your software sits inside an invisible rectangle. When you drag two designs near each other, most programs behave as though those rectangles are the parts. Snap them together and you get a tidy grid of rectangles, which feels efficient and often is not.
Take a heart. Its bounding box is a square, and the heart fills maybe two thirds of it. The pointed bottom leaves two triangles of dead space, and the dip at the top leaves another wedge. Line up six hearts as a grid of squares and you have paid for all of those empty corners.
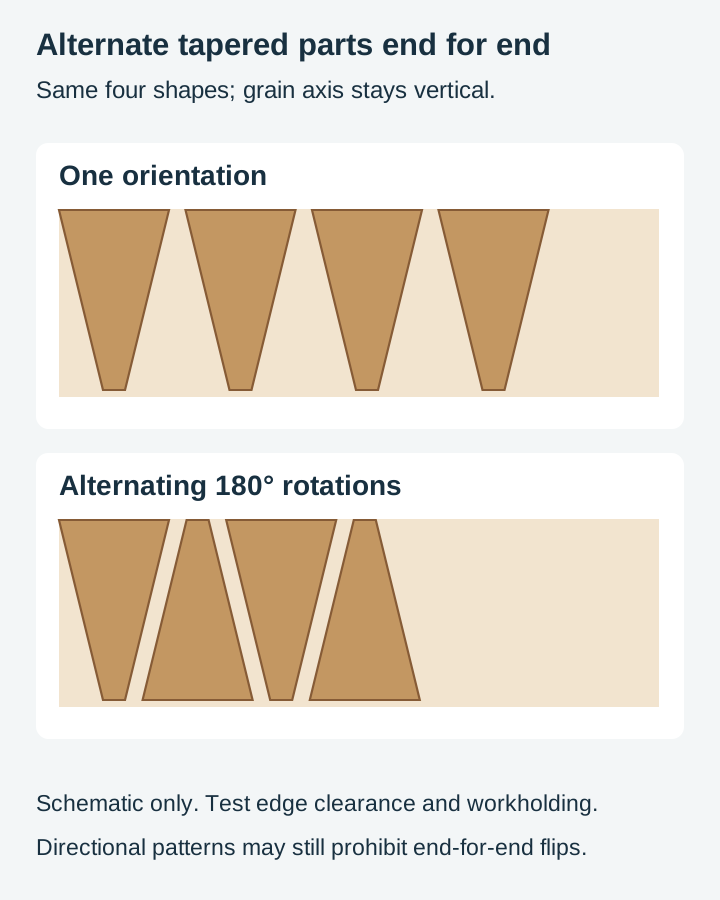
Alternating orientations can let tapered ends fit beside wider ends. The benefit depends on the exact silhouette; compare actual edge clearance and occupied area rather than assuming every heart layout improves. Nothing about the cut changed. The parts simply stopped being treated as boxes.
That is the whole idea, and it applies harder the more irregular your shapes are. A design pack full of gentle organic outlines has more recoverable dead space than a pack of plain rectangles, because rectangles were already efficient and hearts, leaves, animals, and lettering are not.
 Decorative Heart Designs Pack77 designs, commercial license included$3.99
Rotation, and where it stops being free
Rotating parts is the cheapest packing move available. It is also the one with the most constraints attached, and they are worth knowing before you build a layout around a rotation you cannot actually use.
Acrylic has no grain. Rotate anything to any angle. For plain unpatterned acrylic, rotation is usually flexible. Still check surface direction, thickness variation, defects and edge margins.
Plain adhesive vinyl and standard HTV are effectively directionless too, with the important exception of anything patterned, brushed, glitter, or holographic. Those have a visible direction, and two decals cut at 90 degrees to each other from the same roll will not look like they came from the same roll. Check the material before you rotate, not after you weed.
Wood and plywood have grain, and grain overrules packing. A long thin part cut across the grain has a short fibre path running through its narrowest point and snaps far more easily than the same part cut along the grain. Bookmarks, sign hangers, letter strokes, and anything else long and skinny should run lengthwise with the grain even when turning it sideways would fit another part on the sheet. There is more on how different woods behave in our guide to the best wood for laser cutting and engraving.
Leather behaves similarly. It stretches more in one direction than the other, and it has thickness variation across the hide, so rotation is a decision about the finished part rather than about the layout.
Where full rotation is off the table, 180 degrees usually is not. Flipping a part end for end keeps the grain running the same way while still letting a wide end sit next to a narrow one. On tapered shapes that alternation alone recovers a surprising amount of sheet.
Interlocking and part-in-part
Once you stop thinking in rectangles, the next step is treating one part's empty space as another part's home.
Concave shapes are the obvious candidates. A crescent, a horseshoe, a leaf with a deep notch, and a large letter C all have a bay in them that fits a smaller part. If the small part is fully surrounded by the big one, the layout is doing something genuinely clever: the material you cut away to make the hole becomes a second product instead of scrap.
Hollow parts take this further. Large lettering is full of enclosed voids, and the counters inside an O, a D, a B, or an A are big enough to hold a small keychain, a tag, or a heart. Those interiors were going to be waste no matter what. Using them can recover otherwise wasted material, although extra tool time and handling still cost money.
Two rules make part-in-part work rather than fail. First, keep the same clearance inside the hollow as you do anywhere else on the sheet, because the wall of the enclosing part is exactly as vulnerable to heat as the strip between two neighbours. Second, watch the cut order. The inner part has to be cut before the outline that surrounds it, or the surrounding part comes free, shifts, and the inner cut lands somewhere it should not.
Spacing is a principle, not a number
Every guide that hands you a single gap figure for all materials is guessing on your behalf. The right gap depends on your machine, your power and speed, your bit, your material, and the thickness of the sheet in front of you. Here is what the gap actually has to absorb.
Kerf. Your cut has width. A laser beam removes a strip of material along the path, and a router bit removes a strip as wide as the bit. That width comes out of the space between parts, so a gap that looks fine on screen is smaller in reality, on both sides.
The heat affected zone. On a laser, the material immediately beside the cut gets hot even though it was not cut. On wood that shows up as a scorch halo, and two cuts run close together on either side of a thin strip put heat into that strip twice. It can char through, discolor on the face, or come out fragile enough to break when you pop the parts out.
Part movement. As soon as a part is fully cut it is loose. On a laser it can tip into the bed slats or lift on the exhaust draft. On a CNC it can be grabbed by the bit. A slightly wider gap gives you room to keep small bridges or tabs holding parts in place until the job finishes.
Blade drag and material lift on a vinyl cutter. The blade does not vaporize anything, it drags through, and it pulls the material sideways slightly as it turns. Parts crowded together on flexible vinyl on a tired mat will lift at the edges and distort the neighbouring cut.
Workholding on a CNC. Clamps, screws, and tape need somewhere to live, and the bit needs to be able to reach a part without the collet or the dust boot colliding with a clamp. Nesting for a router means nesting around the hold-down as well as around the parts.
So the method is the same one you use for any unfamiliar material. Cut a short test strip of two or three parts on scrap at the spacing you plan to use, then examine the strip left between them. If it is charred through, visibly discolored on the face, or too fragile to survive being handled, open the gap and run it again. Our walkthrough of dialing in a new material with test cuts covers the same single-variable approach in more detail.
Keep a margin at the outer edge of the sheet too. Allow for the measured sheet edge, machine travel, clamps, adhesive coverage and lead-ins. Keep the margin your specific setup needs instead of treating the last centimeter as automatically usable.
Heads up
Shared cut lines, where two parts butt together and one pass cuts both edges at once, save the most material of any nesting technique and are also the easiest to get wrong. Each retained side loses half the cut width at that shared edge. Compensation, tool access, matching contours and release order need deliberate planning; curved common edges can also be possible in suitable software. Worth trying deliberately on scrap. Not worth discovering by accident on a full sheet.
Files that nest well, and files that fight you
This is the part we can speak to directly, because we draw the files. What is inside the SVG decides how much freedom you have when you start arranging.
Each design should be its own object. A normal group can be ungrouped. If separate designs have been unioned or combined into shared geometry, separating them needs more care. Designs that arrive as separate, self-contained shapes can be picked up individually and dropped wherever they fit.
Watch for an invisible background rectangle. Plenty of free files, especially ones exported from design tools rather than drawn for cutting, carry a full-canvas rectangle behind the artwork. It is invisible on screen and it makes the bounding box the size of the whole canvas, so every part refuses to sit closer than the width of the empty space around it. Remove a background rectangle only after checking that it is not an intended cut boundary, frame or backing.
Closed paths matter more than usual here. An open path can behave unpredictably when a program calculates a shape's outline for packing, and it may be rejected by a nester that requires closed part boundaries. Open paths can still be valid scoring or engraving operations. Our guide to fixing open paths covers spotting and repairing them.
Ungrouped is not the same as separated. Some files ungroup into dozens of tiny fragments that used to be one design. When you nest those, you will move a fragment and leave the rest behind. Regroup each complete design before you start arranging so a part behaves like a part.
Bookmarks are a good example of a design type that nests beautifully once the file cooperates. They are long, narrow, and near rectangular, so a sheet of them packs into tight columns with almost nothing left over, and the grain constraint on wood points the same way you already wanted to lay them.
 Bookmark Designs Pack27 designs, commercial license included$3.99
Software, and how much to automate
Manual nesting is genuinely fine for most jobs. Rotate, drag, alternate, and use your program's align and distribute tools to keep gaps even instead of eyeballed. Ten minutes with the mouse and a bit of the thinking above will get you most of the recoverable material on a typical sheet.
Automatic nesting exists and does the same job with an algorithm. Some CAM packages include a nesting function, so check your own software's documentation before you go looking for another tool. There are also standalone options: Deepnest is a free, open source nesting app that takes SVG and DXF, packs parts at arbitrary rotations, and supports placing parts inside the holes of other parts.
Automatic nesting is at its best on a large sheet with many parts of mixed shapes, which is exactly the case where doing it by hand stops being enjoyable. It is at its weakest when constraints matter, because an algorithm does not know your plywood has grain, does not know which face of the sheet is the good one, and will happily rotate a bookmark across the grain to gain a few millimetres. Lock rotation to the angles the material allows and let it work inside that.
One-off jobs and production runs are different problems
For a single project, nesting is a five minute habit, not a discipline. Put everything you are cutting today on one sheet instead of running three separate jobs, alternate the obviously wasteful shapes, and get on with it. The saving is real and the effort is trivial.
Production changes the arithmetic completely, because you are not saving one sheet, you are saving a percentage of every sheet you will ever buy for that product. That is worth an hour of careful work exactly once.
Build the arrangement into a saved master file at final size, with the spacing already proven on that material. Every future run of that product then starts by opening the file rather than by rebuilding the layout and re-learning the gaps. Our guide to batch producing crafts covers the wider production rhythm that layout sits inside.
Build a second, smaller layout for offcuts while you are at it. Half sheets and end strips pile up in every workshop, and the reason they are never used is that using them means rebuilding a layout for an awkward size. A saved four-up arrangement to go with your twelve-up one turns that pile back into stock.
If your run mixes products, nest them together rather than separately. A sheet of bookmarks has long thin gaps down the sides that a row of small hearts or tags fits into perfectly, and the second product effectively comes out of the sheet for free. That combination is easiest when both designs come from packs drawn at a consistent scale, so you are not fighting one design that arrived ten times the size of the other.
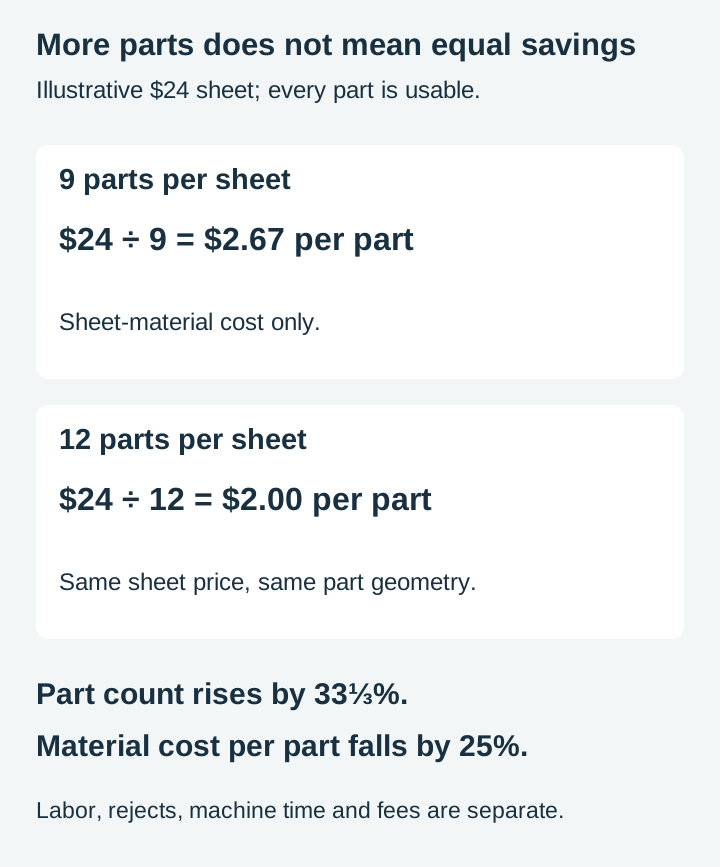
Track the result at least roughly. Parts per sheet is the number to write down, because it converts directly into cost per unit and it is the only way to tell whether a new layout actually improved anything. Going from nine equal parts per sheet to twelve lowers sheet-material cost per part by 25%, assuming the same sheet price and all parts usable. The part count rises by one third, but cost per part falls by one quarter.
Cut order on a nested sheet
A tightly packed sheet is more sensitive to sequence than a sparse one, and a few habits keep a good layout from unravelling at the machine.
Run every engraving pass on the whole sheet before any cutting pass. Once parts are cut free they can shift, and an engraving that lands on a part which moved two millimetres is scrap.
Cut interior details and enclosed parts before the outlines that contain them, for the same reason. Inside first, outside last, all the way up.
Where your software lets you influence the order, avoid cutting several adjacent parts back to back on a heat sensitive material. Working across the sheet rather than straight down one column gives each area a moment to cool instead of concentrating every pass into one corner.
Where to start
The layouts that pay off fastest are the products you make over and over: bookmarks, tags, ornaments, coasters, and small decorative shapes. Those are also the designs where the bounding box wastes the most, so they reward one careful afternoon with lower material cost on every sheet from then on.
Our bookmark designs and decorative heart designs are both built as separate, closed, self-contained shapes, which is what makes them straightforward to pick up and rearrange. Every pack is $3.99, ships as SVG, PNG, JPG, PDF, and EPS, and comes with a commercial license covering unlimited physical products, print-on-demand included.
Cut a test strip first, prove your spacing on scrap, then save the layout that worked. It is the rare improvement you only have to make once.
Designs for this project
Frequently Asked Questions
What does nesting mean in laser cutting and CNC?
Nesting is arranging all the parts you want to cut on one sheet so they occupy as little material as possible. It happens in the design file before the job runs, and it involves rotating parts, tucking irregular shapes into each other's empty space, and dropping small parts into the hollow interiors of large ones. The intended part geometry stays the same, but packing can change heat, workholding and cut-order needs.
How much space should I leave between nested parts?
There is no universal number, because the gap has to cover your machine's kerf plus whatever the material does around the cut, and both vary by machine, power, bit, and sheet. Start from the spacing your manufacturer's material guidance suggests, cut a small test strip of two or three parts on scrap at that spacing, and look at the strip between them. If it is scorched through, discolored, or fragile enough to snap when you pick it up, open the gap and test again.
Can I rotate parts freely to pack them tighter?
On acrylic and most plain adhesive vinyl, yes. On wood, plywood, leather, and any patterned, glitter, or brushed vinyl, no. Those materials have a direction, so rotating a part 90 degrees changes how it looks and how strong it is. Rotating by 180 degrees often preserves the grain axis, but directional patterns and surface effects still need checking, and that alone unlocks a lot of packing on tapered shapes.